| |
|||
Socrates, Comenius 1 Project
|
||||||
|
Students contributions
Year 2, 2003 - 2004
Year 3, 2004 - 2005 Sun Water Earth Air
|

|
|||||||||||||||||||||||||||||||||||||||||||||||||||||||||||||||||||||||||||||||||||||||||||||||||||||||||||||||||||||||
|
Index....................................................................................................................................... 2 Introduction............................................................................................................................ 3 How does photosynthesis works?...................................................................................... 4 Practical work A: Photosynthesis in a coloured leaf......................................................... 6 Our central question is:.................................................................................................... 6 Hypothesis:........................................................................................................................ 6 Needs for lesson 1:.......................................................................................................... 6 To do for lesson 1:............................................................................................................ 6 Needs for lesson 2:.......................................................................................................... 7 To do for lesson 2:............................................................................................................ 7 The results......................................................................................................................... 7 Conclusion and questions............................................................................................... 8 Practical work B: The making of oxygen............................................................................ 9 Our central questions are:................................................................................................ 9 Hypotheses:...................................................................................................................... 9 Needs:............................................................................................................................... 9 To do:................................................................................................................................. 9 Results:.............................................................................................................................. 9 Conclusion:..................................................................................................................... 10 Practical work D: Chromatography from leafs............................................................... 11 Our central questions are:............................................................................................. 11 Hypothesis:..................................................................................................................... 11 Needs:............................................................................................................................. 12 To do:............................................................................................................................... 12 Results:............................................................................................................................ 12 Conclusion:..................................................................................................................... 14 Final Conclusion................................................................................................................. 15 Discussion.......................................................................................................................... 16 Practical work A: Photosynthesis in a coloured leaf................................................... 16 Practical work B: The making of oxygen...................................................................... 17 Practical work D: Chromatography from leafs............................................................ 17 Enclosure number 1 ..18 Enclosure number 2 ..19 Enclosure number 3 ..20 Enclosure number 4 ..21
|
From week 8 until week 18 Anouk and Monique have been working at practical work for biology. This experiment was about photosynthesis.
In this report we are going to explain how photosynthesis works. First we are going to give some background information about the process, then we are going to explain the process with the three experiments we did.
The practical was split up in four parts. The first part (A) was to search for the difference in chloroplasts between covered leafs and uncovered leafs. The second part (B) we compared the making of oxygen from water thyme and American river weed. The third part (C) was an experiment with pencils about chromatography. But because we had already done this experiment at the third class, weve skip that part. So there isnt anything about it in this account. The last part (D) was about the chromatography of leafs from four different kinds of plants. For this experiment we have worked with small group of four students (Wagma, Marianne, Anouk and Monique) and we exchanged our results afterwards.
At last we have a general conclusion and a discussion about the problems we encountered.

All animals live on energy stored in the chemical bonds of organic molecules made by other organisms, which they take in as food. The molecules in food also provide the atoms that animals need to construct new living matter. Some animals obtain their food by eating other animals. But at the bottom of the animal food chain are animals that eat plants. The plants trap energy directly from sunlight. As a result, all of the energy used by animal cells is derived ultimately from the sun. In this article we will explain something about photosynthesis. How plants can make organic molecules out of only inorganic molecules.
Solar energy enters the living world through photosynthesis in plants and photosynthetic bacteria. Photosynthesis allows the electromagnetic energy in sunlight to be converted into chemical bond energy in the cell. Plants are able to obtain all the atoms they need from inorganic sources: carbon from atmospheric carbon dioxide, hydrogen and oxygen from water, nitrogen from nitrates in the soil, and other elements needed in smaller amounts from inorganic salts in the soil. They use the energy they derive from sunlight to build these atoms into sugars, amino acids, nucleotides, and fatty acids. These small molecules in turn are converted into the proteins, nucleic acids, polysaccharides, and lipids that form the plant. All of these substances serve as food molecules for animals, if the plants are eaten later.
 The reactions of photosynthesis take place
in chloroplasts in two stages. The first stage is called photophosphorylation.
In this stage, energy from sunlight is captured by photosynthesis pigments
who give the energy from the light to the electrons of the chlorophyll
molecules. They will make a wider route around the kern of the molecule.
With these electrons can happen two different things: They can hand
over the energy by little quantities. This energy is used for active
transport. The concentration difference on both sites of the membrane
that arises by this, will be used as an energy source for the photosynthesis
of ATP (energy molecules). After this the electron hasnt any energy
left and goes back to the chlorophyll molecule. In the other way the
electrons (full of energy) will be hand over to electrons acceptors.
Because the electrons have a negative charge the molecule who is left
behind gets a positive charge. The electrons will be replaced by other
electrons (without energy). These electrons are usually from water molecules.
Molecular oxygen (O2) derived from the splitting of water by light
is released as a waste product of this first stage.
The reactions of photosynthesis take place
in chloroplasts in two stages. The first stage is called photophosphorylation.
In this stage, energy from sunlight is captured by photosynthesis pigments
who give the energy from the light to the electrons of the chlorophyll
molecules. They will make a wider route around the kern of the molecule.
With these electrons can happen two different things: They can hand
over the energy by little quantities. This energy is used for active
transport. The concentration difference on both sites of the membrane
that arises by this, will be used as an energy source for the photosynthesis
of ATP (energy molecules). After this the electron hasnt any energy
left and goes back to the chlorophyll molecule. In the other way the
electrons (full of energy) will be hand over to electrons acceptors.
Because the electrons have a negative charge the molecule who is left
behind gets a positive charge. The electrons will be replaced by other
electrons (without energy). These electrons are usually from water molecules.
Molecular oxygen (O2) derived from the splitting of water by light
is released as a waste product of this first stage.
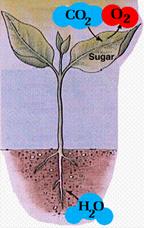
In the second stage, the molecules that serve as energy carriers are used to help drive a carbon fixation process in which sugars are manufactured from carbon dioxide gas (CO2) and water (H2O), thereby providing a useful source of stored chemical bond energy and materials- both for the plant itself and for any animals that eat it. This reaction take place in the liquid of the chloroplasts. You can see the cycle of this reaction on the previous page.
The net result of the entire process of photosynthesis, can be summarized simply in the equation:
light energy + 6 CO2 + 6 H2O à sugar + 6 O2
The sugars produced are then used both as a source of chemical bond energy and as a source of materials to make the many other small and large organic molecules that are essential to the plant cell.
Like we explained before, sugars are manufactured from carbon dioxide gas (CO2) and water (H2O). Almost immediately these sugars are converted into starch. During the night, when there is no photosynthesis, the starch is put in other parts of the leafs.
In the first experiment we are going to investigate what the influence of photosynthesis pigments and light are on the formation of starch. We are going to use a plant with coloured leafs, from which the leafs are partially covered with tin foil. This way we can compare the parts with and without chloroplasts, (the green and the white parts), and the parts from the light and from the dark, (the covered parts and the uncovered parts). Starch can be showed by a solution of iodine.
What is the influence of photosynthesis pigments and light on the formation of sugar?
We think we are not going to find starch on the white parts of the leaf, because there are no photosynthesis pigments. On the covered parts we are not going to find starch too, because photosynthesis needs light. So we think that we are only going to find starch on the green uncovered parts of the leaf.
Ø Plant with coloured leafs, for example Clorophytum, Tradescantia, Hypoëstes sanguiolenta, Scindapsis aureus or the L.maculatum L.
Ø Some tin foil
24 hours later
Ø The plant from lesson 1
Ø Two pans with boiling water
Ø A pair of tweezers
Ø Ethanol in a closed test tube
Ø Test tube rack
Ø Petri plate
Ø Solution of iodine
1. Take the partially covered leaf from the plant.
Anouk van Dijk took the first lesson alone. So we have just one drawing from the first lesson. We took the second lesson with the two of us, so we have two drawings.
We chose the plant Hypoëstes sanguiolenta. It took about 9 minutes before the leaf was uncoloured. For the rest we dont have that many results, just the drawings. They are enclosure 1, 2 and 3.
You can see that all the green parts and some of the white parts became black, because of the iodine.
Here you can see our leaf after the experiment.
If you compare the parts of the leaf with chloroplasts to the ones without - the green parts and the white parts in our case - youll see that the green parts became black after the practical work and some white parts too. The other white parts remained white. If you compare the parts from the light to the ones from the dark, you wont see any difference. The green parts under the tin foil are just as black as the uncovered parts. You can say the same for the white parts of the leaf.
So when we look at our results you can say there isnt any difference between the covered and uncovered parts of the leaf and the parts with and without chloroplasts. .
Our practical work didnt go exactly like we planned. We had expected another result. In the last part of our report, were going to discuss why this practical work didnt turn out like we thought.
Weve already told something about how photosynthesis works. And what kind of substances is necessary for this reaction, and which substances arise. We will repeat the reaction formula:
light energy + 6 CO2 + 6 H2O à sugar + 6 O2
In this experiment we are going to find out if this is correct and if there is a difference between the oxygen production of two different plants.
Which gas will arise during the experiment and is there a difference between the oxygen production of two different plants?
How can we make an experiment to show that carbon dioxide is needed and that the temperature of the surroundings is also very important for photosynthesis?
We think that oxygen arises during the experiment and that the plants wont produce the same quantity of this gas. So it depends on the kind of plant how much oxygen have been produced.
·
 Plants from the water: water thyme, American
river weed.
Plants from the water: water thyme, American
river weed.
· Erlenmeyer, funnel and test tube
· Matches and thin piece of wood
|
|
length (cm) of the test tube filled with air: |
|
|
datum: |
water thyme: |
American river weed: |
|
5 March 2003 (begin) |
0,05 cm |
0,10 cm |
|
7 March 2003 |
1,10 cm |
0,90 cm |
|
10 March 2003 (end) |
1,40 cm |
1,40 cm |
At the end of this practical work we wanted to demonstrate what kind of gas was in the test tube. We followed the instructions, but the glowing piece of wood didnt burn again. Why this didnt happen we will discuss in the last part of this account.
The gas in the tube we wanted to show with the burning piece of wood was oxygen. This appears from our extra information.
With this experiment we wanted to get to know the difference between the oxygen production of two different kind of plants. The water thyme produced the first few days more oxygen than the American river weed. We think thats because the quantity of oxygen that was in the stem. The last couple of days the American river weed produced more oxygen than the water thyme. In the end both plants produced the same quantity of oxygen.
So we can say that there isnt a big difference between the quantity of oxygen the both plants produced after a while, but there is a little difference between the speed the both plants produced oxygen.
If you want to investigate that carbon dioxide is needed for the photosynthesis, you have to make two framings. For one framing you use water that contains carbon dioxide and for the other framing you use water without carbon dioxide. You have to put both framings into the light. All other circumstances has to be similar as our experiment.
If you want to investigate that the temperature of the surroundings is very important for photosynthesis you have to make two framings again. Now you put one framing in a temperature that obviously difference from the temperature you put the other framing into. Both framings have to be in the light. All other circumstances has to be similar as our experiment.
Energy from sunlight is captured by photosynthesis pigments who direct the energy from the light to the electrons of the chlorophyll molecules. These electrons can release their energy and make the rest of the photosynthesis cycle possible.
The photosynthesis pigments exist within the chloroplasts.
There are four different kinds of pigments:
- Chlorophyll A
- Chlorophyll B
- Carotenoids
- Xanthophyll

White light or sunlight is a mixture of all colours of light. You can show all those colours of light with a prism. White light is broken into several weaves with each a different weave length. So you can see all the colours of the rainbow.
If light falls on a green leaf, the green light reflects and the other colours are absorbed. Every pigment absorbed a different weave length, a different colour. The advantage of having four kinds of pigment is that more light can be absorbed. Therefore the pigments can give more energy to the electrons. The photosynthesis pigments are mostly absorbing blue, red and violet light. You can see that in the diagram.
In the next experiment we are going to investigate what the difference is between the rapidity of the four photosynthesis pigments. And we are also going to investigate of there is a difference in the rapiditys of the pigments of different plants.
Whats the difference in rapidity between the four photosynthesis pigments (Chlorophyll b, Chlorophyll a, Carotenoids and Xanthophylls)? And are the rapiditys of the pigments the same by all plants?
We think that the speed of the pigments by every plant is the same and that only the quantity differs. We think the Xanthophylls is the fastest. The second fastest is Carotenoids. The slowest is Chlorophyll b and the second slowest is Chlorophyll a.
· Fresh leafs from a plant, Ligustrum vulgare L., Aegopodium podagrarie L., Sambucus nigra L. and Castanea sativa L
· Mortar and pestle
· Some sand and aceton
· One slip of filtering paper
· A measure cylinders with a piece of cork or glass
· Some liquids, for example aceton (8%) and petroleum/paraffin (92%)
6. Repeat until you will see a clear green dot.
We made four chromatograms with the four of us. Two of them are in this account. They are enclosure number 4. The other two are in the account of Marianne and Wagma.
We compared four chromatograms of the Ligustrum vulgare L of three different groups. (The fourth one from Dirk is a failure) After this we compared the chromatograms of the four different kind of plants from our own group. We always measured from the middle of the spot to the top of one colour. The results are down here.
|
Ligustrum nr. |
Chlorophyll b |
Chlorophyll a |
Carotenoids |
Xanthophylls |
|
1 (ours) |
3,4 |
4,5 |
5,6 |
8,1 |
|
2 (wendy) |
3,8 |
5,25 |
6,2 |
7,0 |
|
3 (sanne) |
6,8 |
7,5 |
7,8 |
8,4 |
The last result we cant compare, because thats the point where the fluid is stopped. To compare this results right, we have to compare the relative rapiditys of the pigments. We calculate this by divide the pigment by the end of the liquid. The end of the liquid is the same as the xanthophylls results. This is because we couldnt finish the experiment because we hadnt enough time. So the ends of the liquid arent all the same. For example: our chlorophyll b: 8,1/3,4 = 0,42
The relative results from all Ligustrum leafs:
|
Ligustrum nr. |
Chlorophyll b |
Chlorophyll a |
Carotenoids |
Xanthophylls |
|
1 (ours) |
0,42 |
0,56 |
0,69 |
1,00 |
|
2 (wendy) |
0,54 |
0,75 |
0,89 |
1,00 |
|
3 (sanne) |
0,81 |
0,89 |
0,93 |
1,00 |

The results of the different plants:
|
Plant nr. |
Chlorophyll b |
Chlorophyll a |
Carotenoids |
Xanthophylls |
|
1. ligustrum |
3,4 |
4,5 |
5,6 |
8,1 |
|
2. Aegopodium |
1,1 |
1,8 |
4,1 |
5,7 |
|
3. Sambucus |
1,9 |
2,7 |
4,85 |
7,5 |
|
4. Castanea |
3,1 |
3,7 |
5,1 |
8,15 |
The relative results of the different plants:
|
Plant nr. |
Chlorophyll b |
Chlorophyll a |
Carotenoids |
Xanthophylls |
|
1. ligustrum |
0,42 |
0,56 |
0,69 |
1,00 |
|
2. Aegopodium |
0,19 |
0,32 |
0,72 |
1,00 |
|
3. Sambucus |
0,25 |
0,36 |
0,65 |
1,00 |
|
4. Castanea |
0,38 |
0,45 |
0,63 |
1,00 |
We already told that chloroplasts contains four different pigments: Chlorophyll b, Chlorophyll a, Carotenoids and Xanthophylls. Xanthophylls is the fastest. The second fastest is Carotenoids. The slowest is Chlorophyll b and the second slowest is Chlorophyll a. We can conclude this from our chromatogram.
As you can see from the relative results of the three Ligustrum vulgare L. chromatograms we cant make a clear conclusion. The results are all very different in compare to each other. For example: The chlorophyll B from Sannes chromatogram is as twice as fast as ours. We can explain this by the differences in concentration of the solution of chloroplasts. Sanne and Wendy could have done less acetone in the solution than we did. There also can be a difference in the time we put the chromatogram into the acetone.
When we compare the chromatograms from the four different plants, you can see in the diagram that the plants arent exactly the same. Especially chlorophyll a and b differs more than carotenoids. But you can also see that the pigments of the Aegopodum podagrarie L. and the Sambucus nigra L. dont differs very much.
The Ligustrum vulgare L. and the Castanea sativa L. dont differs much either.
The chromatogram of the Aegopodum podagrarie L. fails a little bit, because the fluid lag behind if you compared it with the others. The time from these chromatograms was about the same. There can only be a difference in the concentrations of the solution of chloroplasts.
There are some results that dont differs very much, but they arent exactly the same. So we can conclude that there are different rapiditys of the same pigments of different plants.
We have proven oxygen, starch and pigments. We hope the process is explained properly. The tests didnt all turn out the way we planned. The explanations about that follow.
In spite of the problems we had and the time there was between the different parts of the experiment (we did the practical work in 10 weeks, but we only need 6 lessons..), we liked the practical work. It was fun.
Making this account took a lot of work, because our results werent very clear and writing your account in English isnt very easy. But we learned a lot from it.

During our practical works we have had a couple of problems. In this part we will discuss these problems and recommend adjustments to the practical work, so the experiment can be done without many problems in the future. We will discuss the problems one by one. First the problems with practical work A, than B and at last D.
Like we said before in this account, experiment A didnt go exactly like we thought it will. After we did the experiment we discussed the problems in the class and tried to explain the many problems. Here they are:
This practical work needs a lot of adjustments to get a good result. We hope it will with the adjustments we wrote about.
We had two main problems with this experiment.
With this problem we didnt have much big problems. We had a few little ones.
(*) Anouk and Monique forgot the drawing!

Schools in the project
Martin-Schongauer-Gymnasium Breisach, DE
Interconfesionelle SG het Westland, Naaldwijk, NL
“Carmen Sylva” Highschool, Eforie Sud, RO
Vordingborg Gymnasium, DK
News in the project

| Copyright© 2005 Carmen Sylva High School |